Blackberry and Peach Galette with Cinnamon Ice Cream Recipe

We use affiliate links in our posts and our site. This means if you make a purchase using these links, we may earn a small commission. You don’t pay a cent more than you would otherwise! Our full disclosure is available under About.

It’s that time of year when we have peaches coming out of our ears!  We have so many peach trees here out on the farm I decided to bake a galette for the first time.  A Galette (pronounced GAL-ette) is a type of free-form French tart.  It’s nice because there is no tart pan needed!  Now this isn’t to be confused with the Breton Galette, which is the buckwheat pancake.

Blackberry Peach Galette

While the traditional French tart has every piece of fruit and dough molded to perfection, the galette is much less fussy and closer to the American pie in taste.

Blackberry Peach Galette (get the printable recipe here.)


Ingredients

  • 1 premade pie crust
  • 5 peaches, peeled, pitted, and sliced
  • 1/3 cup fresh blackberries
  • 1/4 cup brown sugar
  • 2 tbsp honey
  • 1/2 tsp cinnamon
  • 1/2 tsp nutmeg
  • 2 tsp vanilla
  • 2 1/4 tbsp all-purpose flour
  • 1 egg 
  • turbinado sugar for dusting
  • sliced almonds for the crust

Directions

  1. Line a baking sheet with parchment paper.
  2. If you used a pre-made store pie crust, take it out from the freezer and let it thaw. (It should still be cold).  Remove from the pie pan and flatten into a circle on the parchment paper.  Don’t worry about it looking perfectly pretty, galettes are not perfect!
  3. In a bowl, combine peaches and vanilla.
  4. In a separate bowl, combine brown sugar, cinnamon, nutmeg, and flour.  Mix well to combine.
  5. Add the dry mixture to the peaches.  
  6. Pour in the honey and stir.
  7. Fold in the blackberries.
  8. Pour the fruit filling into the center of the crust, leaving a 2 inch border.  Now, working around the galette, fold the edges of the dough over the fruit.
  9. Place the galette into the freezer for 15 minutes.
  10. Preheat oven to 350F.
  11. Remove galette from freezer.
  12. Brush the folded edge of dough with the egg wash.
  13. Sprinkle the dough edge with slivered almonds and turbinado sugar.
  14. Bake for 30min to 1 hour.  The crush should be golden brown and the fruit insides should be bubbling when done.  
  15. Serve warm or cold, I suggest with ice cream.

I adopted the recipe from this website, tidy mom.

the fruit juices leak onto the paper while cooking… that’s okay and expected!

Want to know what this tastes good with? Cinnamon ice cream!!  I use an ice cream maker to make my own ice cream.  You could just serve it up with store bought vanilla too!

Easy Blackberry Peach galette with homemade cinnamon ice cream!

Cinnamon Ice Cream Recipe (printable recipe here)


Ingredients

  • 1 3/4 cups whipping cream
  • 1 1/4 cup whole milk
  • 1 tsp vanilla
  • 2 tsp ground cinnamon
  • 3/4 cup granulated sugar
  • *optional: 1/4 tsp xanthan gum (makes it a little thicker, optional ingredient)

Directions

  1. Add the cream and milk together and stir in the sugar.  Stir until the sugar dissolves.  This should be hand-stirred, if you use a mixer you could end up with butter.
  2. Add the vanilla.
  3. Slowly pour in the cinnamon so you don’t end up with cinnamon chunks.  If you are using the xanthan gum, slowly add it in as well so you don’t have chunks.
  4. Pour your mixture into your ice cream mixer and wait.
  5. When the ice cream mixer is done, either serve immediately or store in a freezer air-tight container.  To help decrease ice crystals, put some saran wrap directly on the ice cream and then close the lid.  This helps decrease the ice crystals that form!

Blackberry Peach Galette

Yum yum, doesn’t it look delicious? Well let me tell you… it was!  The four of us gobbled it up and left only one piece… for someone’s breakfast the next day.  Dessert for breakfast? I know you do that too, don’t lie 😉

You can also follow me by clicking on these: bloglovin, instagramtwitterpinterest, and google plus.


linking up at: amaze me monday The Scoop!  2 Bees in a Pod,  Metamorphosis Monday’s Inspire Me Tuesday Moonlight and Mason Jars Wow us Wednesdays! Creative Ways  Share Your Style Thursday Favorite ThingsYour Turn to Shine The Inspiration Gallery My Romantic Home  Home Sweet Home Feathered Nest Fridays Foodie Friday & Everything Else  Sunday’s Down Under Share it One More Time

Follow:

Orange Blossom Macarons Recipe like Laduree

We use affiliate links in our posts and our site. This means if you make a purchase using these links, we may earn a small commission. You don’t pay a cent more than you would otherwise! Our full disclosure is available under About.

I have been back in the kitchen baking macarons.  I have been longing to try Laduree’s famous orange blossom macarons, but I just couldn’t wait until my trip to Paris in April.  So I attempted to bake them at home!
This post may contain affiliate links.

Orange Blossom Macaron recipe

The result? DELICIOUSNESS!  I was unsure if I would like them since I don’t really like rose flavored things… but the orange blossom flavor is just as if I walked through the orange grove around the block with my mouth open and ate the smell.

No surprise that the blogger of a blog with the name of peonies and orange blossoms likes, well, orange blossom macarons!

Materials needed: (affiliate links are used for your convenience)

    • a food scale (yes, you need this. I use this one)
    • a piping tip and piping bag (I like the ateco #806, I use these tips and piping bag)
    • Food coloring (the gels or dry powder works best, not the liquid store stuff)
    • A macaron template
    • food processor (I use this one)
Laduree Orange Blossom Macaron recipe

Laduree Macaron shell Recipe (from Ladurée Macarons)
275g ground almonds
250g powdered sugar
210g egg whites
210g granulated sugar

1.  Mix almond meal and the powdered sugar in a food processor. Be careful not to grind too long, otherwise it will form a paste.

2. Sift the almonds and powdered sugar. Set aside.

3. Weigh out granulated sugar.

4. Weigh the egg whites.  Beat them slowly on a low speed until foamy. SLOWLY add the granulated sugar to the egg whites as you beat.  Once all mixed, increase speed to medium and beat until a firm meringue forms.  You want a firm meringue with glossy peaks but not stiff peaks.  They should defy gravity and remain in the bowl if you turn it upside down.  If you tilt your bowl to the side and they are sliding out, keep beating.

5. Add the food coloring gel and mix.
6. Then fold in 1/3rd of the almond/sugar mixture into the meringue with a silicone spatula.  Once combined, add another third of the almond mixture. Add last bit.  This batter requires more deflation during this step since it creates such a poofy meringue.

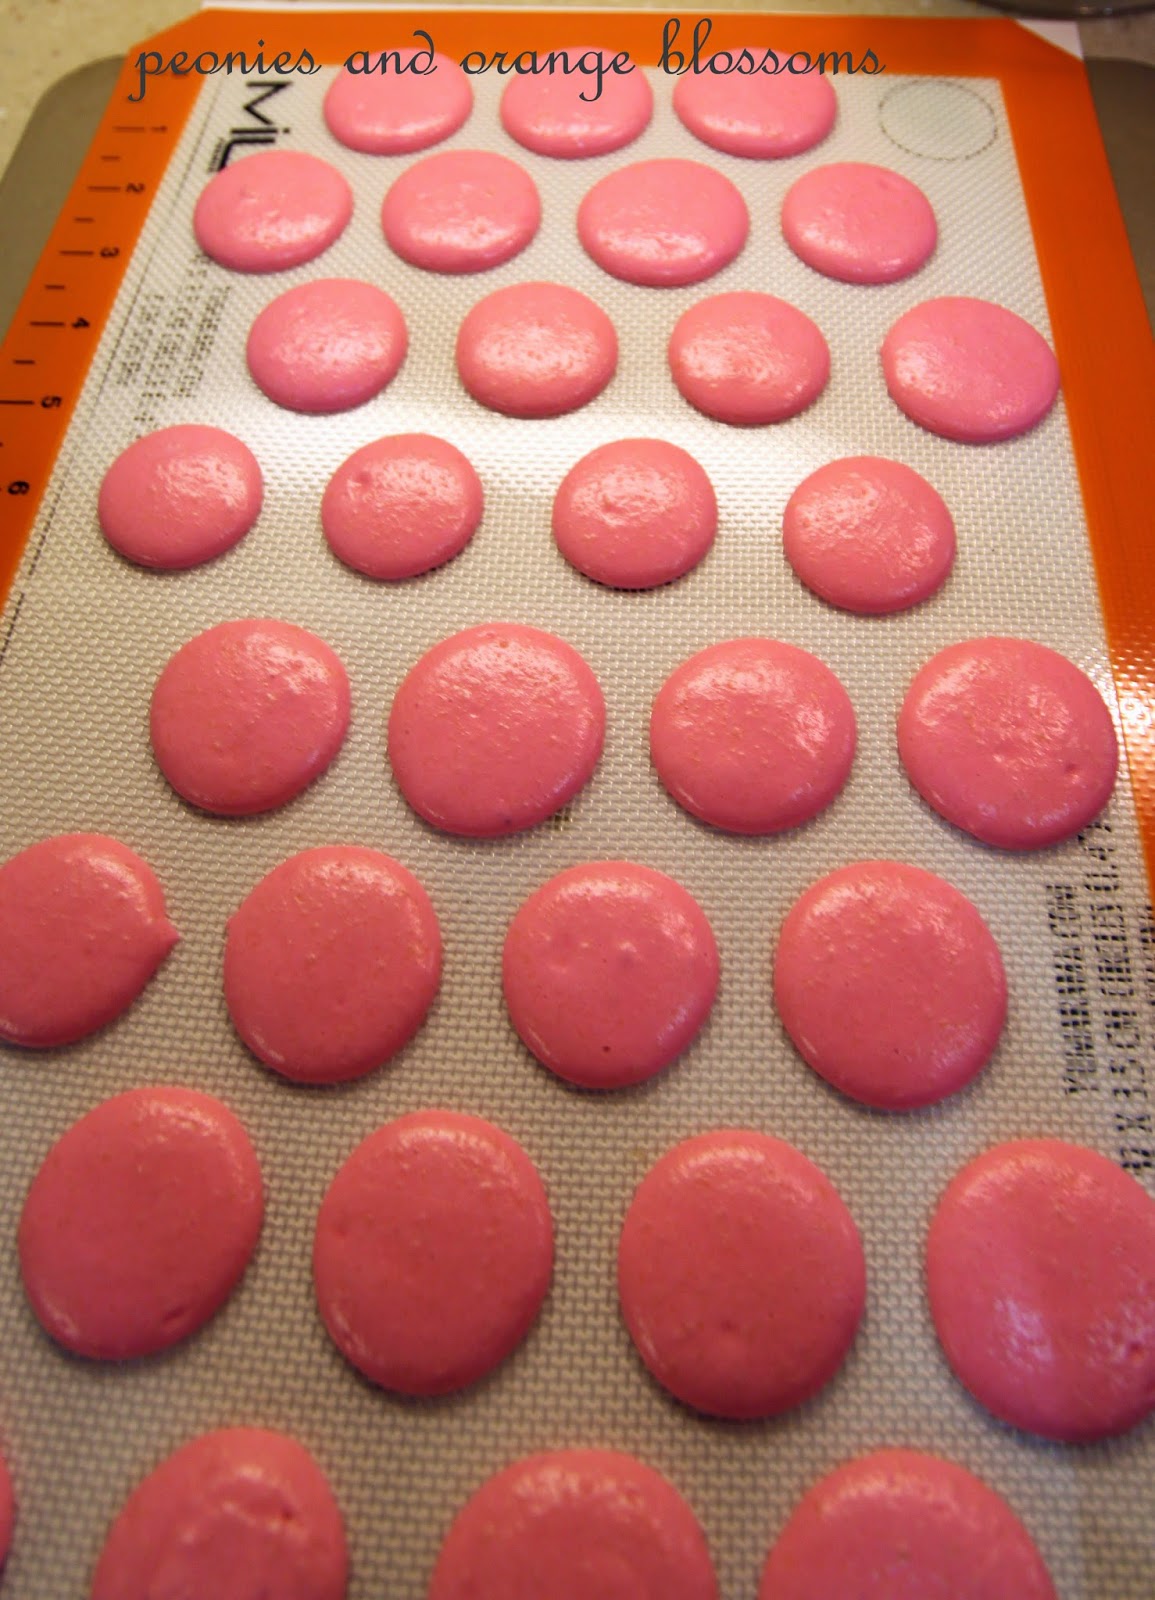
7. Add the batter to a piping bag. . Pipe in rows using your template onto parchment paper.

8. Pick up the pan and beat until the counter.  The cookies need to rest on the counter between 30-60 minutes.  They are ready to go in the oven when they are dry to touch (the shell shouldn’t stick to your finger)

9.  Set the oven to 300F.

10. Bake the cookies for 13-15 minutes one sheet at a time. They are done when they look kind of matte and seem firm when you lightly tap on them.  You can always rescue a slightly overcooked one with the maturation process that comes later, but you cannot rescue an undercooked one!!

11.  Remove from paper once completely cool. If they stick they stick to the paper, they aren’t cool yet. Or you undercooked them.

Laduree Orange Blossom Cream Filling
4 tbsp (60 mL) orange blossom water (you can get it: buy here)
4 1/2 tsp (15 g) corn starch
2/3 cup (160mL) heavy cream
1/2 cup (100g) granulated sugar
3 1/2 ounces (100g) white chocolate, coarsely chopped
7 1/2 tbsp (110g) softened butter
1 drop green food coloring

Directions

  1. Whisk the 3 tbsp (45mL) of the orange blossom water into the cornstarch.
  2. Combine the cream and sugar in a saucepan and heat until simmering.  Whisk the simmering liquid into the cornstarch mixture.  Then return it to the saucepan, continuing to whisk over low heat for 30 seconds until thickened and smooth.  Pour into a bowl.
  3. Use a spatula and little by little stir in the chocolate into the hot cream.
  4. Now pour into a food processor until it cools slightly
  5. Add the butter gradually, the remaining orange blossom water, food coloring and process until smooth and creamy.
  6. Pour into a dish, cover with plastic cling wrap and plate it directly onto the cream.  Refrigerate for at least 2 hours until firm enough to be piped.
  7. Spoon the orange blossom cream into a piping bag and pipe into the remains shells.
  8. Refrigerate the macarons in an air-tight container for at least 12 hours before serving. This allows the “macaronnage” to occur and makes the cookie super yummy.  If you eat it immediately it’s really good, if you wait 12 hours… perfection!

Get the printable recipe here

Orange Blossom Macaron Recipe

SaveSave

Follow:

Biscoff/Speculoos Cookie Butter Macaron Recipe

We use affiliate links in our posts and our site. This means if you make a purchase using these links, we may earn a small commission. You don’t pay a cent more than you would otherwise! Our full disclosure is available under About.

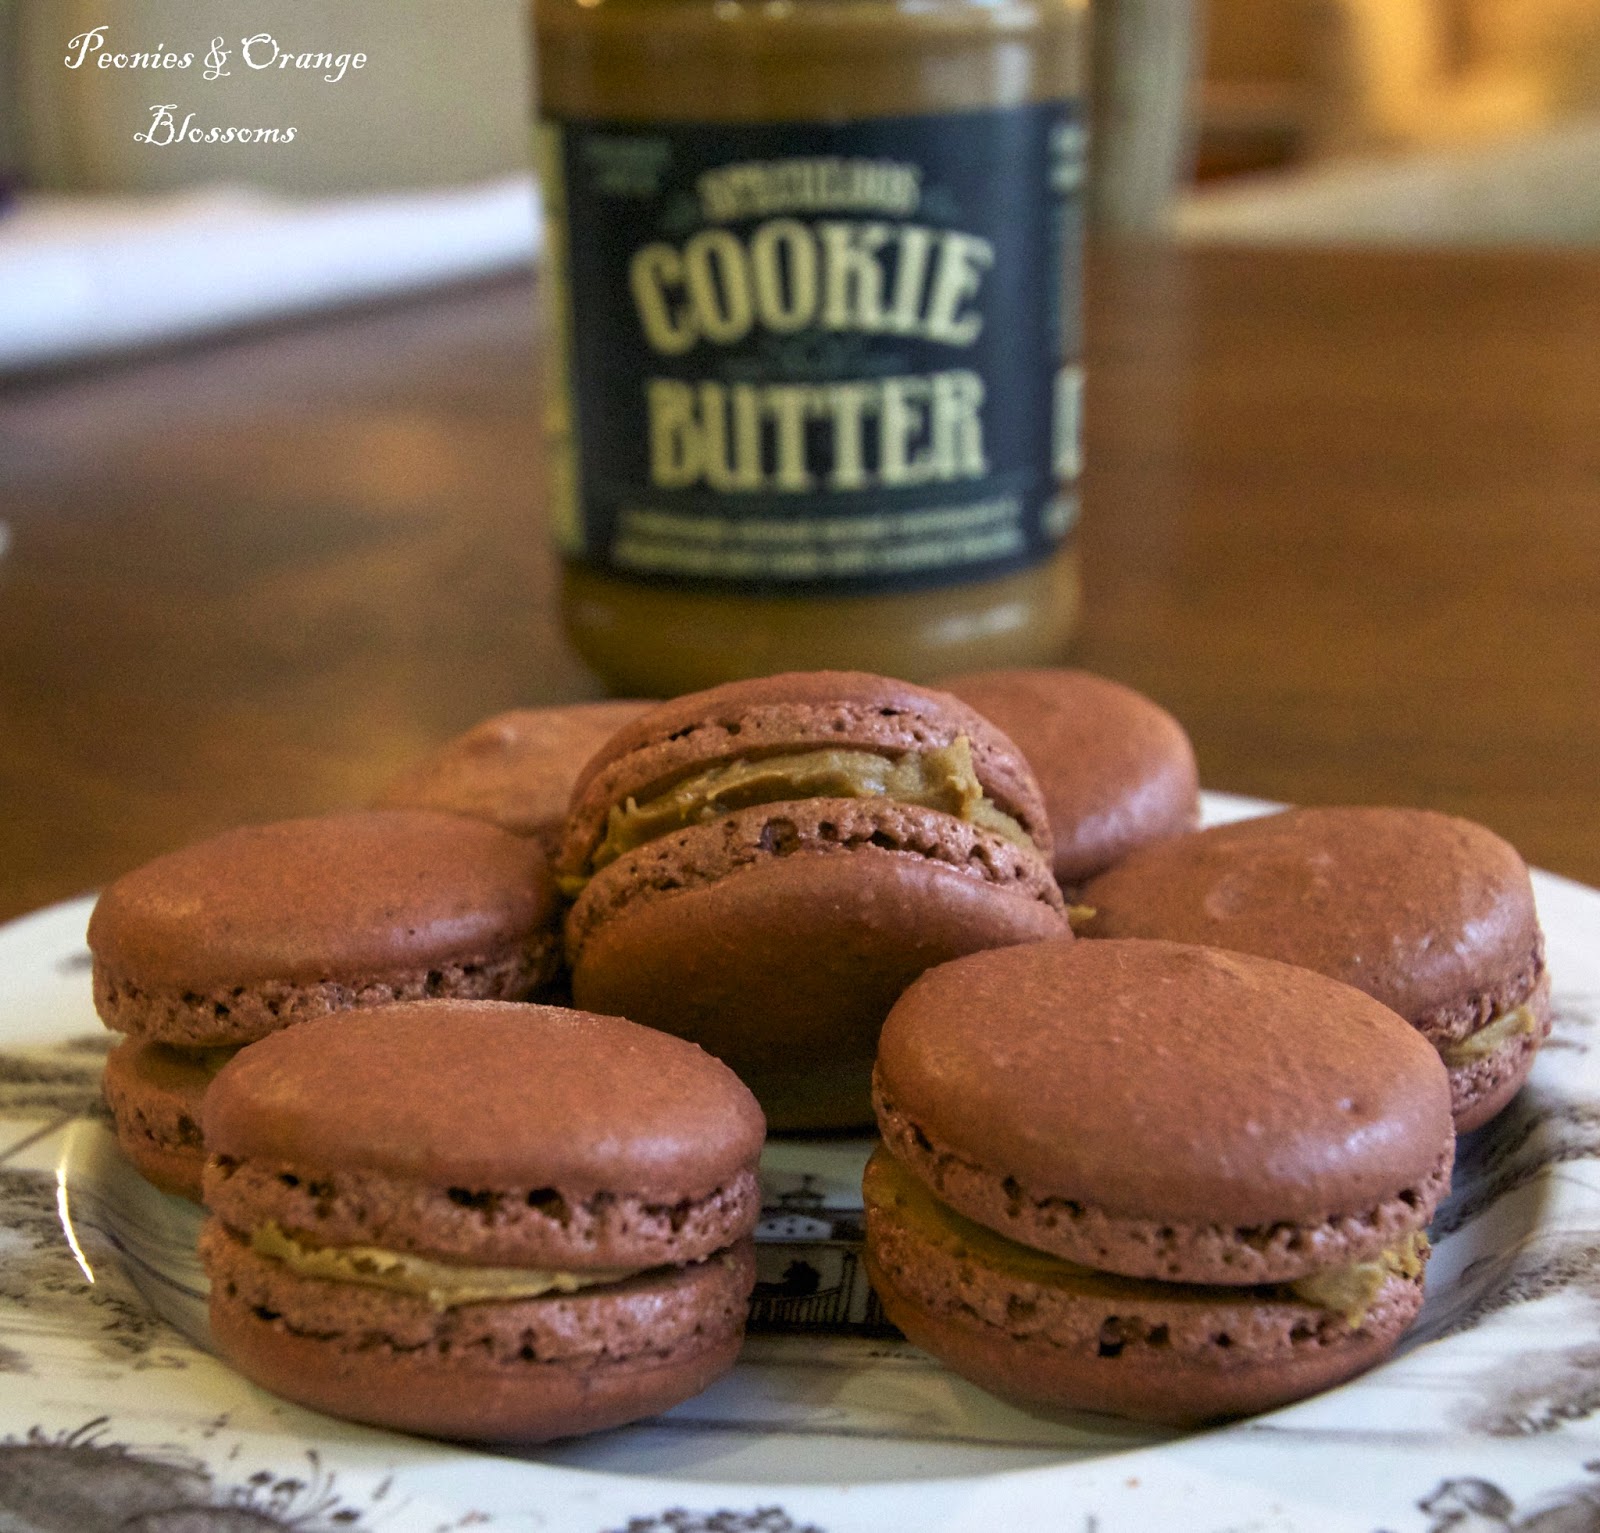
Remember how I mentioned how I loved cookie butter.  I had some chocolate macaron shells laying around (yes, I literally have macarons laying around the house… the life of a macaron lover and baker!) and I didn’t know what to do them.  I thought… I love cookie butter. I love chocolate macarons. Why not… combine the two?  I made a cookie butter chocolate cupcake here and it was yummy.

This post may contain affiliate links. See my disclosure policy.

The combination was a win. If you don’t know what cookie butter tastes like… it’s like brown sugar, caramel, with a hint of spice.

Cookie Butter Biscoff Chocolate Macaron Recipe

Materials needed:

  • a food scale (yes, you need this. I use this one)
  • a piping tip and piping bag (I like the ateco #806, I use these tips and piping bag
  • Food coloring (the gels or dry powder works best, not the liquid store stuff)
  • A macaron template (either make one or get one here or here. It makes piping easier)
  • food processor (for the cream filling, I use this one)

Chocolate Macaron Shell: GET THE PRINTABLE RECIPE HERE
260g almond flour
250g powdered sugar
15g cocoa powder
210g granulated sugar
210g egg whites

1.  Mix almond meal, cocoa powder, and the powdered sugar in a food processor. Be careful not to grind too long, otherwise it will form a paste.

2. Sift the almonds, cocoa powder, and powdered sugar. Set aside.

3. Weigh out granulated sugar.

4. Weigh the egg whites.  Beat them slowly on a low speed until foamy. SLOWLY add the granulated sugar to the egg whites as you beat.  Once all mixed, increase speed to medium and beat until a firm meringue forms.  You want a firm meringue with glossy peaks but not stiff peaks.  They should defy gravity and remain in the bowl if you turn it upside down.  If you tilt your bowl to the side and they are sliding out, keep beating.

5. Add the food coloring gel and mix.  To make mine a richer brown color, I used “chocolate brown” food coloring.


6. Then fold in 1/3rd of the almond/sugar mixture into the meringue with a silicone spatula.  Once combined, add another third of the almond mixture. Add last bit.  This batter requires more deflation during this step since it creates such a poofy meringue.

7. Add the batter to a piping bag.  Pipe in rows using your template onto parchment paper. 

8. Pick up the pan and beat until the counter.  The cookies need to rest on the counter between 30-60 minutes.  They are ready to go in the oven when they are dry to touch (the shell shouldn’t stick to your finger)

9.  Set the oven to 300F.

10. Bake the cookies for 13-15 minutes one sheet at a time. They are done when they look kind of matte and seem firm when you lightly tap on them.  You can always rescue a slightly overcooked one with the maturation process that comes later, but you cannot rescue an undercooked one!!   

11.  Remove from paper once completely cool. If they stick they stick to the paper, they aren’t cool yet. Or you undercooked them.


Cookie Butter Filling
Go to Trader Joe’s and buy a tub of cookie butter. Either the smooth or crunchy. I tried both.. they both taste good.
Or you can use the Biscoff cookie butter filling. I think I saw a Target have it once.


Directions
1. Carefully spread some cookie butter filling on one side of the cooled macaron shells, then place a shell on top.
2. Refrigerate in an air-tight container for 12 hours before serving. Why? This allows the “macaronnage” to occur… basically the flavors all meld together to make a delicious cookie even better.


Biscoff Cookie Butter Chocolate Macaron recipe

Need macaron supplies? Check out my amazon store


Linking up with these fabulous link parties: The Scoop!, Inspire Me Tuesday,Wow us Wednesdays!Creative Ways ,Share Your Style,Feathered Nest Fridays, Home Sweet Home

Written at http://peoniesandorangeblossoms.blogspot.com

This post may contain affiliate links.

Follow:

Biscoff Cookie Butter Chocolate Cupcakes

We use affiliate links in our posts and our site. This means if you make a purchase using these links, we may earn a small commission. You don’t pay a cent more than you would otherwise! Our full disclosure is available under About.

I have a delicious recipe for you! Cookie Butter Chocolate Cupcakes!  I’m assuming by now you’ve tried cookie butter. AKA Biscoff spread. AKA cookie in a tub.  It’s really yummy.  If you haven’t had had a Biscoff cookie, they taste like… brown sugar, caramel, with a hint of spice. The first time I had one was from American Airlines years ago. Anyway…

The chocolate cupcake recipe is not mine. It’s from Niner Bakes. 

Chocolate Cupcakes

Ingredients

  • 2 cups granulated sugar
  • 1 3/4 cups flour
  • 3/4 cup unsweetened cocoa powder
  • 1 1/2 tsp baking powder
  • 1 1/2 tsp baking soda
  • 1 tsp of salt
  • 2 eggs
  • 1 cup milk
  • 1/2 cup vegetable oil
  • 2 1/2 tsp vanilla extract
  • 1 cup hot boiling water

Directions

  1. Preheat oven to 350 and line your cupcake pan with cupcake liners.
  2. In your mixer bowl, mix together eggs, milk, oil, and vanilla extract. Beat together.
  3. In a separate bowl, add sugar, flour, baking soda, baking powder, cocoa, and salt.  Mix together.  
  4. Slowly add dry ingredients to wet ingredients and mix.
  5. Carefully pour in boiling water then mix.  *start mixing slowly at first so you don’t get burned!*
  6. Pour the very thin batter into the cupcake pan, filling the liners 2/3 full.
  7. Bake for 20-24 minutes, until toothpick comes out clean from the center.
  8. Let cupcakes cool completely before frosting. (If you don’t, your frosting will look like mine in the pictures!)

Biscoff Cookie Butter Frosting

Ingredients

  • 3 cups powdered sugar
  • 3/4 cup cookie butter spread (can use the crunchy or smooth spread)
  • 1/4 cup butter, softened
  • 1 tsp vanilla extract
  • 1/3 cup milk (skim or low fat is fine)

Directions

  1. Put all ingredients into a bowl. Mix together.  **Note, if it’s not the right consistency, you may add more powdered sugar.
  2. Frost once cupcakes are cool. If not, the frosting runs (like in my pictures! Hey, I was hungry!)

If you would like to substitute peanut butter instead of biscoff cookie butter in the frosting, you can. I did. It’s really easy.  Then you have peanut butter cupcakes.

Linking up with these fabulous link parties: The Scoop!, Inspire Me Tuesday,Wow us Wednesdays!Creative Ways ,Feathered Nest Fridays, Share Your Style,Home Sweet Home

Written at http://peoniesandorangeblossoms.blogspot.com

Follow:

Chocolate Ganache Macaron Recipe

We use affiliate links in our posts and our site. This means if you make a purchase using these links, we may earn a small commission. You don’t pay a cent more than you would otherwise! Our full disclosure is available under About.
Chocolate Ganache Macarons

I’ve been busy baking macarons again.  This time I’ve made chocolate ganache macarons, adapted from Laduree’s recipe.  They are GOOD.  These would be perfect to make for Valentine’s Day.  They will go fast!

chocolate ganache macarons

Materials needed:

  • a food scale (yes, you need this. I use this one)
  • a piping tip and piping bag (I like the ateco #806, I use these tips and piping bag
  • Food coloring (the gels or dry powder works best, not the liquid store stuff)
  • A macaron template (either make one or get one here or here. It makes piping easier)
  • food processor (for the cream filling, I use this one)


Chocolate Macaron Shell: PRINTABLE RECIPE HERE

260g almond flour

250g powdered sugar

15g cocoa powder

210g granulated sugar

210g egg whites


1.  Mix almond meal, cocoa powder, and the powdered sugar in a food processor. Be careful not to grind too long, otherwise it will form a paste.

2. Sift the almonds, cocoa powder, and powdered sugar. Set aside.

3. Weigh out granulated sugar.

4. Weigh the egg whites.  Beat them slowly on a low speed until foamy. SLOWLY add the granulated sugar to the egg whites as you beat.  Once all mixed, increase speed to medium and beat until a firm meringue forms.  You want a firm meringue with glossy peaks but not stiff peaks.  They should defy gravity and remain in the bowl if you turn it upside down.  If you tilt your bowl to the side and they are sliding out, keep beating.

5. Add the food coloring gel and mix.  To make mine a richer brown color, I used “chocolate brown” food coloring.

6. Then fold in 1/3rd of the almond/sugar mixture into the meringue with a silicone spatula.  Once combined, add another third of the almond mixture. Add last bit.  This batter requires more deflation during this step since it creates such a poofy meringue.

7. Add the batter to a piping bag.  Pipe in rows using your template onto parchment paper.

8. Pick up the pan and beat until the counter.  The cookies need to rest on the counter between 30-60 minutes.  They are ready to go in the oven when they are dry to touch (the shell shouldn’t stick to your finger)

9.  Set the oven to 300F.

10. Bake the cookies for 13-15 minutes one sheet at a time. They are done when they look kind of matte and seem firm when you lightly tap on them.  You can always rescue a slightly overcooked one with the maturation process that comes later, but you cannot rescue an undercooked one!!  

11.  Remove from paper once completely cool. If they stick they stick to the paper, they aren’t cool yet. Or you undercooked them.


Chocolate Ganache

290g chocolate (minimum 70% cacao solid)

1 cup + 2 tbsp heavy cream

60g butter

1.  Finely chop the chocolate and place in a large bowl.

2.  In a saucepan, bring the cream to a boil.  Pour the hot cream in 3 parts over the chopped chocolate, mixing with a wooden spoon between each addition.

3.  Cut the butter in small pieces and stir into the ganache until spoon.

4.  Transfer to a baking dish and cover with plastic wrap.  Allow the ganache to cool at room temperature and then refrigerate for 1 hour until it is thick and creamy.

5.  After the cookies and ganache are cooled, fill the cookies with ganache.

6.  Store in the refrigerator for 24 hours before enjoying.

Linking up with these fabulous link parties: The Scoop!, Inspire Me Tuesday,Wow us Wednesdays!Feathered Nest Fridays, Home Sweet Home

http://peoniesandorangeblossoms.blogspot.com

This post may contain affiliate links.

Follow:

Madeleines Recipe

We use affiliate links in our posts and our site. This means if you make a purchase using these links, we may earn a small commission. You don’t pay a cent more than you would otherwise! Our full disclosure is available under About.

I have been wanting to attempt to make madeleines for a while.  When I received my Laduree Sucre book for my birthday last year, I decided to tackle them sooner rather than later, but never bought a pan for them.  For Christmas this year I received TWO pans (yippee!) so I went ahead and made them.

…and not only did I nail the recipe, but they tasted a million times better than I thought they would!  My husband described the cookies as “heavenly”. Whoa.

Madeleine French cookie recipe

Have you ever had a Madeleine cookie?  They are not the typical cookie in the American sense… they are more cake like.  They are very delicate.  I had never had one fresh out of the oven.  Straight out of the heaven they are SUPER GOOD.  They have a crunch on the bottom, super soft and airy in the middle, then the little bump on the top is a tiny bit gooey like lemon curd.

the crunchy backside of the madeleine!

I had only ever had them pre-made, ya know, from Starbucks in the package or Costco.  I never had one super fresh.  The French have been keeping this secret from us… you must eat these super fresh!! That’s when they taste like heaven.  Otherwise they are just… pretty good!

The recipe I used is from Laduree’s Sucre book.

Madeleines Recipe – Laduree: The Sweet Recipes . PRINTABLE VERSION HERE

Ingredients

  • 2 lemons, unwaxed (Meyer tastes best)
  • 3/4 c + 1 tbsp (160g) granulated sugar
  • 1 1/3 cups + 1 tbsp cake flour (175g cake flour)
  • 2 tsp (10g) baking powder
  • 12 1/2 tbsp (180g) unsalted butter
  • 1 tbsp butter for the moulds
  • 4 eggs
  • 1 2/3 tbsp (35g) honey
  • Madeleine Pan, this one is good: Madeleine Pan

Directions
1. Using a grater, remove the zest from the lemons.  Then mix the zest with the sugar.
2. In another bowl, sift together the flour and baking powder.
3. In a small saucepan, melt the butter over low heat.
4. In another bowl, place the eggs, sugar/lemon mixture, and honey. Whip together until pale and frothy.  Then fold in the flour and baking powder mixture.  Add the melted butter and combine.
5. Refrigerate batter for a minimum of 12 hours in a closed container. NOTE: I did a batch at refrigeration of 4 hours and refrigeration of 12 hours and I could NOT tell the difference in taste.  As long as the batter is cold at 4 hours, you can use it.  The key is cold!
6. Melt the tbsp of butter and butter the moulds with a pastry brush.  Then refrigerate for 15 minutes until the butter is hardened and the pan is cold.
7. Preheat oven to 390 degrees. Fill moulds 3/4 to the top with batter.  Cook madeleines 8-10 minutes.  Remove when golden and allow to cool slightly before removing from the moulds.

TIPS
-The key is to have the batter and pan COLD.  The rapid change in temperature in the oven helps create the poofy shape of these cookies!
-Serve when lukewarm.  They taste like heaven at this temperature!
-Store in airtight container.

perfect little bump!

They made the perfect little bump and are golden in color.

Cooling on the rack, the smell of lemon in the air!  Little bites of heaven waiting for you!

Linking up with these fabulous link parties: The Scoop!, Inspire Me Tuesday,Wow us Wednesdays! Creative Ways Centerpiece Wednesdays, Feathered Nest FridaysHome Sweet Home,

Written at http://peoniesandorangeblossoms.blogspot.com
search terms: madeleine recipe, madeline recipe, lauder madeleine, french cookie

Follow:

Skinny Cranberry Bliss Bars

We use affiliate links in our posts and our site. This means if you make a purchase using these links, we may earn a small commission. You don’t pay a cent more than you would otherwise! Our full disclosure is available under About.

I LOVE the cranberry bliss bars at Starbucks. But… they are like 300 some calories. AND they cost money.

I have been looking for some recipes on pinterest and baked one and it was DELICIOUS. Now it’s time to share it with y’all.

This recipe is not my own.  The original recipe is from Skinny Mom.  I did alter a little bit,  I like having some orange with the cranberry, the original recipe did not call for it.
Ingredients:

  • 2 cups all-purpose flour (Gold Metal)
  • 1/2 tsp baking soda
  • 1/4 tsp salt
  • 1/8 teaspoon ground cinnamon
  • 2/3 cup granulated sugar
  • 2/3 cup brown sugar, unpacked
  • 1/4 cup melted unsalted butter
  • 2 large egg whites
  • 1/4 cup unsweetened apple sauce
  • 2 tsp vanilla extract
  • 2/3 cup white chocolate chips 
  • 1/3 cup dried cranberries, chopped


For the Frosting:

  • 8 oz 1/3 less fat cream cheese, softened
  • 1/2 cup powdered sugar
  • 1/3 cup white chocolate chips, melted (melt in 15 second increments until melted in microwave)
  • 1/3 cup dried cranberries, 
  • 1/2 tsp vanilla extract
  • 1/8 tsp orange zest


Directions:

Preheat oven to 350°F.  Lightly spray a 9 x 13 inch non-stick baking pan with cooking spray. 

In another bowl, whisk the sugars with the butter, egg whites, applesauce and vanilla until light and fluffy.


In a large bowl, combine the flour, baking soda, salt and cinnamon and stir to blend.

Whisk the dry ingredients into the wet ingredients in two additions until the batter is very well blended. 
Fold in white chocolate chips and 1/3 cup cranberries. Spread batter into the greased baking pan.


Bake 10 – 14 minutes, until the edges are light brown and a toothpick inserted comes out clean. Let it cool completely on wire rack. 

Meanwhile, prepare the frosting; in a large bowl, use an electric mixer to beat the cream cheese, powdered sugar, fresh orange zest, and vanilla until well-blended. 


Frost the bars once they are cool and sprinkle with remaining cranberries. Drizzle with the melted white chocolate.

Then cut each square in half diagonally to create triangles. Store in the refrigerator until ready to serve. Serve chilled, it tastes better! 

the cookie bar pre-frosting!

The great part is that these bars are only 150 calories… half the amount of calories of the original bar. AND they taste just as good!!

Pictures are my own. The recipe is from Skinny Mom.

Written at http://peoniesandorangeblossoms.blogspot.com

Linking up with these fabulous link parties: The Scoop!Inspire Me Tuesday,Wow us Wednesdays!  Centerpiece WednesdaysCreative Ways Home Sweet Home Feathered Nest FridaysFoodie Friday

Follow:

Oh My, Apple Pie!

We use affiliate links in our posts and our site. This means if you make a purchase using these links, we may earn a small commission. You don’t pay a cent more than you would otherwise! Our full disclosure is available under About.

We went apple picking not too long ago.  The intention was to pick apples and then use the apples to bake an apple pie.  Well… there were no baking apples left!  Apple pickin’ in Southern California is not like apple pickin’ in Washington (remember… Washington is a major apple growing state!).

So… we settled for store bought apples.

Check out our masterpiece:

The Best Apple Pie Recipe!

My husband and I have NEVER made an apple pie before.  Can you believe we made this??
We used a recipe from Williams Sonoma.  I copied the recipe here with the alterations we made:

The BEST apple pie recipe: (printable version here)

For the dough:

  • 2 1/2 cups all-purpose flour
  • 1 tsp. salt
  • 2 tsp. granulated sugar
  • 16 Tbs. (2 sticks) cold unsalted butter, cut into 1/2-inch dice
  • 3 to 4 Tbs. ice water

For the filling:

  • 2 lb. Granny Smith apples, peeled, cored and cut into slices 1/4 inch
      thick
  • 2 lb. Honey Crisp apples, peeled, cored and cut into slices 1/4 inch thick
  • 1/2 cup firmly packed light brown sugar
  • 1/4 cup granulated sugar
  • 1/2 tsp. ground cinnamon
  • 1/4 tsp. salt
  • 1/4 tsp. freshly grated nutmeg
  • 4 tsp. cornstarch
  • 1 Tbs. fresh lemon juice
  • 1 egg white, beaten with 1 tsp. water
  • 2 tsp. granulated sugar

Directions:

To make the dough, in a food processor, pulse the flour, salt, and granulated sugar together until combined, about 5 pulses. Add the butter and process until the mixture resembles coarse meal, about 10 pulses. Add 3 Tbs. of the ice water and pulse 2 or 3 times. The dough should hold together when squeezed with your fingers but should not be sticky. If it is crumbly, add more water 1 tsp. at a time, pulsing twice after each addition. Turn the dough out onto a work surface, divide in half and shape each half into a disk. Wrap the disks separately in plastic wrap and refrigerate for at least 2 hours or up to overnight.

On a lightly floured work surface, roll out half of the dough into a 12-inch round about 1/8 inch thick. Fold the dough in half and then into quarters and transfer it to a 9-inch deep-dish pie dish. Unfold and gently press the dough into the bottom and sides of the dish. Trim the edges flush with the rim of the dish. Refrigerate for 30 minutes.

On a large sheet of lightly floured parchment paper, roll out the remaining dough disk into a 12-inch round about 1/8 inch thick. Using leaf pie cutters, make rows of cutouts in the dough, spacing them 1/2 inch apart and leaving a 1-inch border along the edges, to create a lattice appearance. Reserve the cutouts for decorating. Reroll the dough scraps to make more cutouts. Refrigerate the lattice top and cutouts for 30 minutes.

Meanwhile, make the filling: In a large Dutch oven, stir together the apples, brown sugar, granulated sugar, cinnamon, salt, nutmeg and cornstarch. Set over medium heat, cover and cook, stirring occasionally, until the apples are just tender but not mushy, about 20 minutes. Uncover and cook until the liquid has thickened and become glossy, 5 to 7 minutes more. Remove from the heat, stir in the lemon juice and let cool to room temperature, about 30 minutes.

Position a rack in the lower third of an oven, place a baking sheet on the rack and preheat the oven to 400°F.

Let the pie shell, lattice top and leaf cutouts stand at room temperature for 5 minutes. Transfer the apple filling to the pie shell, then gently invert the lattice top over the pie. Trim the edges flush with the rim of the dish and press the top and bottom crusts together to seal. Brush the underside of the leaf cutouts with egg wash and gently press them onto the edges of the piecrust, overlapping the leaves slightly. Decorate as desired with the remaining leaves. Brush the entire top crust with egg wash and sprinkle with the granulated sugar.

Place the pie dish on the preheated baking sheet. Bake until the crust is crisp and golden brown, about 1 hour, covering the edges with aluminum foil if they become too dark. Transfer the pie to a wire rack and let cool for at least 1 1/2 hours before serving. Serves 8.
Williams-Sonoma Kitchen.
Action shots:
Here is our lattice top.  Here is a link to the cut outs WS sells this year: here and here

 The cut outs:

The Masterpiece:

 Closer look at the edge of our pie:

Now top with some vanilla ice cream and enjoy!

Written at http://peoniesandorangeblossoms.blogspot.com

Linking up with these fabulous link parties: The Scoop!,  Metamorphosis Monday’sInspire Me Tuesday,Wow us Wednesdays! What’s it WednesdaysCenterpiece WednesdaysCreative Ways Treasure Hunt ThursdayHome Sweet Home Feathered Nest Fridays, Foodie Friday

best apple pie recipe
#applepie
williams sonoma apple pie recipe

Follow:

Pumpkin Chocolate Chip Cookies

We use affiliate links in our posts and our site. This means if you make a purchase using these links, we may earn a small commission. You don’t pay a cent more than you would otherwise! Our full disclosure is available under About.

I had been hankering for something pumpkin-y that was not a latte.  I finally found a recipe on pinterest that I decided to try. And it was SO GOOD I just had to share it again with you all.

pumpkin chocolate chip cookies

The nice (for my tongue, not my waist) part of these cookies is that they aren’t TOO sweet. Which means you can eat more. Gulp.

I’m munching on these as I type this. Better wipe my crumbs of the keyboard…
The recipe is NOT mine. To be a curteous blogger, I will not post the full recipe here.  You will have to check out Sally’s Baking Addiction for the full recipe.  She made them. She deserves all of the praise. I just had to share them with everyone.

Some tips:

  • definitely chill these before you bake them.
  • let them cool down before you eat.  They get BETTER with age. Whaaat?
  • You can eat three. If you make them small enough they’re only like 80-100 calories each. So they’re practically healthy, right??
Pumpkin chocolate chip cookies

Be sure to check out Sally’s Baking Addiction for the full recipe! 

Linking up with these fabulous link parties: Linking up with these fabulous link parties: The Scoop!,  Inspire Me TuesdayWow us Wednesdays!

Follow:

Chocolate Hazelnut Cat Macarons

We use affiliate links in our posts and our site. This means if you make a purchase using these links, we may earn a small commission. You don’t pay a cent more than you would otherwise! Our full disclosure is available under About.

As you know, I LOVE macarons.  Earlier this year I did a feature, Macaron Mondays, for a few months.  For this upcoming Halloween, I created some scary cat chocolate hazelnut macarons!

The recipe is adapted from Laduree’s Sucre book.

scary cat chocolate hazelnut macarons

Materials needed:

  • a food scale (yes, you need this. I use this one)
  • a piping tip and piping bag (I like the ateco #806, I use these tips and piping bag)
  • Food coloring (the gels or dry powder works best, not the liquid store stuff)
  • A macaron template (either make one or get one here or here. It makes piping easier)
  • food processor (for the cream filling, I use this one)
  • Googly food eyes
  • Food marker

Chocolate Macaron Shell – CLICK HERE FOR A PRINTABLE RECIPE

260g almond flour

250g powdered sugar

15g cocoa powder

210g granulated sugar

210g egg whites

1.  Mix almond meal, cocoa powder, and the powdered sugar in a food processor. Be careful not to grind too long, otherwise it will form a paste.

2. Sift the almonds, cocoa powder, and powdered sugar. Set aside.

3. Weigh out granulated sugar.

4. Weigh the egg whites.  Beat them slowly on a low speed until foamy. SLOWLY add the granulated sugar to the egg whites as you beat.  Once all mixed, increase speed to medium and beat until a firm meringue forms.  You want a firm meringue with glossy peaks but not stiff peaks.  They should defy gravity and remain in the bowl if you turn it upside down.  If you tilt your bowl to the side and they are sliding out, keep beating.

5. Add the food coloring gel and mix.  To make mine a richer brown color, I used “chocolate brown” food coloring.

6. Then fold in 1/3rd of the almond/sugar mixture into the meringue with a silicone spatula.  Once combined, add another third of the almond mixture. Add the last bit.  This batter requires more deflation during this step since it creates such a poofy meringue.

7. Add the batter to a piping bag.  Pipe in rows using your template onto parchment paper.  To add the cat ears, pipe a tiny bit and use the flick of your wrist to make it point at the tip.  This takes some practice.  I piped half the rows with cat ears and the other half as regular circles.  This way when you assemble the cookies you have the cat on one side and a regular circle on the other.

8. Pick up the pan and beat until the counter.  The cookies need to rest on the counter between 30-60 minutes.  They are ready to go in the oven when they are dry to touch (the shell shouldn’t stick to your finger)

9.  Set the oven to 300F.

10. Bake the cookies for 13-15 minutes one sheet at a time. They are done when they look kind of matte and seem firm when you lightly tap on them.  You can always rescue a slightly overcooked one with the maturation process that comes later, but you cannot rescue an undercooked one!!

11.  Remove from paper once completely cool. If they stick they stick to the paper, they aren’t cool yet. Or you undercooked them.

Assembly and filling:Ingredients for the filling

•Chocolate Hazelnut filling (I cheated and used Nutella!)

•googly eyes

•food markers

•flat circles for the nose (I used some sprinkles from decorating sugar cookies)

•small tube of frosting (to glue the eyes to the cat)


1. Once your cookies have cooled, draw a cat’s face with the black food marker.

2. Pipe two circles on the cat’s face and attach the googly eyes.

3.  Fill the inside with a small amount of Nutella and twist the back on.

4.  Store inside the refrigerator for approximately 24 hours before enjoying… trust me, it will taste better!

chocolate cat macarons
Chocolate Cat Macarons!
getting the cat ears right takes practice!

I had fun taking pictures of these cute little cookies!

scary cat chocolate hazelnut macaron


Follow:

Lemon Raspberry Macaron Recipe!

We use affiliate links in our posts and our site. This means if you make a purchase using these links, we may earn a small commission. You don’t pay a cent more than you would otherwise! Our full disclosure is available under About.
Lemon Raspberry Macaron Laduree Recipe

This post may contain affiliate links. See my disclosure policy.

Thought Macaron Mondays had ended last week? So did I… until I made some more!

I had intended just to make lemon macarons when it hit me as the meringue was whipping… what if I added… raspberry! *evil laugh*. I did. And it was good.

Lemon Raspberry Macaron Laduree Recipe

Time for the recipe.
It’s from this fabulous book: Laduree: The Sweet Recipes.  Let’s get started. 
Three recipes today: The macaron shells, the lemon filling, and the raspberry filling.
GET THE PRINTABLE RECIPE HERE


Materials needed:

  • a food scale (yes, you need this. I use this one)
  • a piping tip and piping bag (I like the ateco #806, I use these tips and piping bag
  • Food coloring (the gels or dry powder works best, not the liquid store stuff)
  • A macaron template (either make one or get one here or here. It makes piping easier)
  • food processor (for the cream filling, I use this one)

Laduree Macaron shell Recipe

275g ground almonds  

250g powdered sugar   

210g egg whites          

210g granulated sugar 

1.  Mix almond meal and the powdered sugar in a food processor. Be careful not to grind too long, otherwise it will form a paste.

2. Sift the almonds and powdered sugar. Set aside.

3. Weigh out granulated sugar.

4. Weigh the egg whites.  Beat them slowly on a low speed until foamy. SLOWLY add the granulated sugar to the egg whites as you beat.  Once all mixed, increase speed to medium and beat until a firm meringue forms.  You want a firm meringue with glossy peaks but not stiff peaks.  They should defy gravity and remain in the bowl if you turn it upside down.  If you tilt your bowl to the side and they are sliding out, keep beating.

5. Add the food coloring gel and mix.

6. Then fold in 1/3rd of the almond/sugar mixture into the meringue with a silicone spatula.  Once combined, add another third of the almond mixture. Add last bit.  This batter requires more deflation during this step since it creates such a poofy meringue.

7. Add the batter to a piping bag.  Pipe in rows using your template onto parchment paper.

8. Pick up the pan and beat until the counter.  The cookies need to rest on the counter between 30-60 minutes.  They are ready to go in the oven when they are dry to touch (the shell shouldn’t stick to your finger)

9.  Set the oven to 300F.

10. Bake the cookies for 13-15 minutes, one sheet at a time. They are done when they look kind of matte and seem firm when you lightly tap on them.  You can always rescue a slightly overcooked one with the maturation process that comes later, but you cannot rescue an undercooked one!!   

11. Remove from paper once completely cool. If they stick to the paper, they aren’t cool yet. Or you undercooked them.


Lemon Filling Recipe
Ingredients

  • 160g granulated sugar
  • zest of 1 lemon, grated (approx. 5 grams)
  • 5g cornstarch (cornflour)
  • 3 whole eggs
  • 110mL lemon juice (use fresh lemon juice)
  • 235g butter, softened

Directions
1. Prepare the lemon cream one day in advance.

2. In a bowl, mix together the sugar and lemon zest. Then add the cornstarch.

3. Add the eggs one at a time and then the lemon juice.

4. Pour this mixture into a saucepan and cook over low heat, stirring with a spatula until it simmers, allowing the cream to thicken.

5. Remove from heat.

6. Allow the cream to cool slightly for approx. 10 minutes so that is hot but not scalding (approx. 140 degrees Fahrenheit).  (Now, if you got egg white chunks in it like I did one time, just strain the lemon mixture before adding the butter).

7. Add the softened butter.

8. In a blender or food processor, blend the butter and cream together until mixed. 

9. Keep in airtight container for minimum of 12 hours so that the cream may become firm.


Raspberry Filling Recipe
Ready for this recipe: go buy seedless raspberry jam. Done!


Filling the cookie shells:
1. On one side of the cookie shell, fill one-half of the shell with lemon cream.  On the other cookie shell, fill one-half the shell with raspberry jam.  Twist the two shells together to get them to stick. 


2. Let cookies rest in the fridge for a minimum of 12 hours but preferably 24 hours.  This allows the “macaronnage” to occur. (basically, the ingredients all soak in together and make the cookie taste amazing!).

Lemon Raspberry Macaron Laduree Recipe

This is the end of Macaron Mondays (for now).  To check out my other macaron recipes, either click on the “recipe” link above or the macaron link below!

written at http://peoniesandorangeblossoms.blogspot.com
 I’ve linked up with:The Scoop! at Confessions of a Plate Addict/Stone Gable, Inspire Me Tuesday at a Stroll Thru Life, Do Tell Tuesday at a Vintage Zest,  Tickle my Tastebuds Tuesday,  Wow us Wednesdays! at Savvy Southern Style, What’s it Wednesdays at Ivy & Elephants, Centerpiece Wednesdays at The Style Sisters Feathered Nest Fridays at French Country Cottage,   Home Sweet Home at the Charm of HomeG’day Saturdays at Natasha in Oz Sunday Best Showcase at Twigg Studios.and worthwhile Wednesdays! Be sure to check out all of these fabulous blogging parties! A big thank you to all of the wonderful hosts!


This post was featured at The Scoop!, Tickle my Tastebud Tuesday’s feature at A Kitchen Hoor’s Adventure, and Do Tell Tuesday at Diane;s Vintage zest!  Thank you all for the features!

Follow:

Fourth of July Fruit Flags

We use affiliate links in our posts and our site. This means if you make a purchase using these links, we may earn a small commission. You don’t pay a cent more than you would otherwise! Our full disclosure is available under About.

With Fourth of July just around the corner, I thought I’d share some of my favorite fruit flag desserts that I have found throughout the internet!  I was inspired to search after I posted my flag dessert from Memorial Day, seen HERE.

Browsing through pinterest… I found all of these wonderful flag desserts.  Let’s look at them all!


First up though is my fruit flag I made this time for the Fourth of July.  I used golden raspberries, blackberries, and raspberries.  As most of the fruit flags I saw were made with strawberries, I thought mine was a little different.  Now grab a spoon and serve up with ice cream!

Fourth of July Berry Flag with raspberries and black berries

Watermelon, blueberry, and pineapple flag tray…

www.pinterest memorial day food | memorial-day-recipe
4th of july flag dessert source

Strawberry, blueberry, and white chocolate (or yogurt) covered pretzels…

4th of July Snack Idea. great idea  this i could do.
4th of july flag dessert source

Brownie, marshamallow, strawberry, and blueberry flag kabobs…

Brownie Kebabs
fourth of july flag dessert source

Okay, so this isn’t in the shape of a flag but it looked so good!  A strawberry, blueberry cheesecake!

Fourth of July!! would be adorable and much healthier over an angel food cake! Just have to figure out how to fix the hole in the middle :)
strawberry blueberry patriotic cheesecake source

Strawberry, blueberry, banana flag kabobs

Fruit flag made of fruit kabobs on a serving tray for 4th of July! #patriotic red white and blue
flag kabobs

Cheese, watermelon, strawberry, blueberry fruit flag

Cheese and fruit flag!  So easy!
fourth of july flag kabob

Blackberry, raspberry, pineapple, strawberry flag…

Fruit flag
fourth of july flag

Fourth of july fruit cake… fruit salad below with cool whip and then strawberries and blueberries.

Layered Fruit Flag Salad
patriotic fruit salad and cake source 

Strawberry, blueberry, marshmallow fruit flag…

Fruit flag!
marshamallow, blueberry, strawberry fruit flag

Strawberry, blueberry, marshmallow fruit flag kabobs!

Fourth of July fruit flag!
marshamallow, strawberry, blueberry fruit kabobs

Fruit tarts!

Cute Food For Kids?: 4th of July Party Food Ideas
flag fruit tarts source

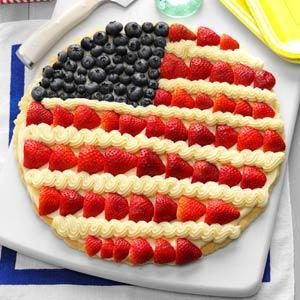
Flag pizza cookie cake

Patriotic Pizzas Recipe
flag pizza cookie cake source

Flag cheesecake bites…

Fruited-Cheesecake Flag
fourth of july cheesecake bites source

Fourth of july flag, this one has cherries!

Serious eats 4th of July flag fruit salad recipe.  Serve with dollops of Truwhip.
source

Ok, not in the shape of a flag… but a deconstructed flag. Had to include this one, a flag tart!

With ready-to-roll sugar cookie dough, fresh fruits, and lemon-cream filling, this dessert is quick to make.
fresh patriotic berry tart source

A sheet cake from the store that someone added fresh cherries and blueberries on top.

Order a sheet cake with white frosting from the bakery. Add blueberries for the stars and cherries for the stripes.
flag cherry and blueberry cake source 

The fruit flag I made for memorial day weekend… golden rapsberries, strawberries, and blueberries! Perfect with ice cream or whipped cream. Or just eat plain!

Fourth of July fruit flag with blueberries, golden raspberries, and strawberries!

Fourth of july raspberry and blueberry cake!

fourth of july flag cake source

UPDATE: Thank you to Posed Perfection for featuring this post at Creative Ways Thursdays! 
Check out my Fourth of July board and follow me on pinterest:


 I’ve linked up with:The Scoop! at Confessions of a Plate Addict/Stone Gable, Inspire Me Tuesday at a Stroll Thru Life, Do Tell Tuesday at a Vintage Zest,  You’re Going to Love it Tuesday at Kathe with an E,  Tickle my Tastebuds Tuesday,  Wow us Wednesdays! at Savvy Southern Style, What’s it Wednesdays at Ivy & Elephants, Centerpiece Wednesdays at The Style Sisters Feathered Nest Fridays at French Country Cottage, The Charm of Home Say G’day at Natasha in Oz Sunday Best Showcase at Twigg Studios. Be sure to check out all of these fabulous blogging parties! A big thank you to all of the wonderful hosts!


linking up at: Metamorphosis Monday’s  Wow us Wednesdays! Creative Ways  Share Your Style Thursday Favorite Things Your Turn to Shine Foodie Friday & Everything Else The Inspiration Gallery 2 Bees in a PodMy Romantic Homeamaze me monday,

Written at http://peoniesandorangeblossoms.blogspot.com/

Follow:

Cherry Almond Macaron Recipe!

We use affiliate links in our posts and our site. This means if you make a purchase using these links, we may earn a small commission. You don’t pay a cent more than you would otherwise! Our full disclosure is available under About.

Sharing yet another macaron recipe as part of Macaron Mondays.  Today’s recipe is Cherry Almond macarons.  They are really good!

This post may contain affiliate links. See my disclosure policy.

Cherry Almond Macarons Recipe

Cherry Almond Macaron Recipe – click HERE FOR THE PRINTABLE RECIPE

For the macaron cookie shell recipe, I use the Laduree macaron recipe.

Materials needed:

  • a food scale (yes, you need this. I use this one)
  • a piping tip and piping bag (I like the ateco #806, I use these tips and piping bag
  • Food coloring (the gels or dry powder works best, not the liquid store stuff)
  • A macaron template (either make one or get one here or here. It makes piping easier)
  • food processor (for the cream filling, I use this one)

Laduree Macarons Recipe –

275g ground almonds  

250g powdered sugar   

210g egg whites          

210g granulated sugar 

1.  Mix almond meal and the powdered sugar in a food processor. Be careful not to grind too long, otherwise it will form a paste.

2. Sift the almonds and powdered sugar. Set aside.

3. Weigh out granulated sugar.

4. Weigh the egg whites.  Beat them slowly on a low speed until foamy. SLOWLY add the granulated sugar to the egg whites as you beat.  Once all mixed, increase speed to medium and beat until a firm meringue forms.  You want a firm meringue with glossy peaks but not stiff peaks.  They should defy gravity and remain in the bowl if you turn it upside down.  If you tilt your bowl to the side and they are sliding out, keep beating.

5. Add the food coloring gel and mix.

6. Then fold in 1/3rd of the almond/sugar mixture into the meringue with a silicone spatula.  Once combined, add another third of the almond mixture. Add last bit.  This batter requires more deflation during this step since it creates such a poofy meringue.

7. Add the batter to a piping bag.  Pipe in rows using your template onto parchment paper.

8. Pick up the pan and beat until the counter.  The cookies need to rest on the counter between 30-60 minutes.  They are ready to go in the oven when they are dry to touch (the shell shouldn’t stick to your finger)

9.  Set the oven to 300F.

10. Bake the cookies for 13-15 minutes, one sheet at a time. They are done when they look kind of matte and seem firm when you lightly tap on them.  You can always rescue a slightly overcooked one with the maturation process that comes later, but you cannot rescue an undercooked one!!   

11. Remove from paper once completely cool. If they stick to the paper, they aren’t cool yet. Or you undercooked them.

Cherry-Almond Filling Recipe:

Makes enough for 40 small sandwiched macarons.

  • 4 ounces of almond paste***
  • 1 stick unsalted butter, cut into cubes, at room temperature
  • 1/2 pint of cherry preserves or cherry pie filling (I used cherry preserves from Trader Joe’s)
  • a pinch of salt
  • cinnamon 
  • nutmeg
  1. In a food processor, place the contents of the cherry preserves and start to grind until the large chunks of cherries are gone.  
  2. Add a little bit of cinnamon and a dash of nutmeg to taste.  Add more if you want it to be spicier tasting.  Set mixture aside.
  3. Now, in the bowl of an electric mixer with a paddle attachment, beat the almond paste on low speed to break it up.
  4. Slowly incorporate the butter while the mixture is running.  When the butter is completely incorporated the mixture will be smooth.
  5. Add the ground cherries in and a pinch of salt.  Mix until it appears well-mixed.
  6. You may store this cream if it is covered and in the fridge for up to 2 weeks.

Assembling the cookies:

  1. Add the filling to the macarons. I used a piping bag to pipe the filling in.
  2. Store the filled cookies in the refrigerator for at least 24 hours for the best results.

***If you don’t have any almond paste, here’s my recipe for almond paste:

Almond paste recipe:

  • 4 ounces of almonds (blanched. I used the pre-ground almonds from Trader Joe’s)
  • 4 ounces powdered sugar
  • 1/2 an egg white

1. Grind the almonds in a food processor.
2. Add the sugar and grind again.
3. Add the egg white and continue grinding. Keep grinding until it looks like a paste.

I adapted the cherry almond filling recipe from this wonderful book:

Les Petits Macarons: Colorful French Confections to Make at Home

I want to point out below the different between not folding the almond mixture in enough and folding it in perfectly.  Notice the first ones I piped look like ice cream cones?  They are not mixed enough.  I then remedied the problem and folded my batter a few more times in order to get my cookies to lie flat.

macaron piping

See the difference?  These ones below are now perfectly folded and therefore lie nice and flat.

The cherry preserves I used:

The finished product…

cherry almond macaron recipe

Yum yum!

Cherry Almond Macaron Recipe

For my favorite product recommendations for making such delicate cookies, check out my amazon store

 I’ve linked up with:The Scoop! at Confessions of a Plate Addict/Stone Gable, Merry Mondays at my pinterventures, Inspire Me Tuesday at a Stroll Thru Life, Do Tell Tuesday at a Vintage Zest,  You’re Going to Love it Tuesday at Kathe with an E,  Tickle my Tastebuds Tuesday,  Creative Ways at Posed Perfection,   Wow us Wednesdays! at Savvy Southern Style, What’s it Wednesdays at Ivy & Elephants,  Feathered Nest Fridays at French Country Cottage, Sunday Best Showcase at Twigg Studios. Say G’day  Be sure to check out all of these fabulous blogging parties! A big thank you to all of the wonderful hosts!

Written  at http://peoniesandorangeblossoms.blogspot.com
This post may contain affiliate links.

Follow:

Orange Macaron Recipe

We use affiliate links in our posts and our site. This means if you make a purchase using these links, we may earn a small commission. You don’t pay a cent more than you would otherwise! Our full disclosure is available under About.

Did you try those lemon macarons?  Well, it’s easy to copy the same recipe with any citrus. I adapted the lemon macaron recipe for orange macarons!
This post may contain affiliate links. See my disclosure policy.

yum!

I use Laduree’s recipe.

Materials needed:

  • a food scale (yes, you need this. I use this one)
  • a piping tip and piping bag (I like the ateco #806, I use these tips and piping bag
  • Food coloring (the gels or dry powder works best, not the liquid store stuff)
  • A macaron template (either make one or get one here or here. It makes piping easier)
  • food processor (for the cream filling, I use this one)


Laduree Macarons Recipe – FOR A PRINTABLE RECIPE CLICK HERE

275g ground almonds  

250g powdered sugar   

210g egg whites          

210g granulated sugar 


1.  Mix almond meal and the powdered sugar in a food processor. Be careful not to grind too long, otherwise it will form a paste.


2. Sift the almonds and powdered sugar. Set aside.


3. Weigh out granulated sugar.


4. Weigh the egg whites.  Beat them slowly on a low speed until foamy. SLOWLY add the granulated sugar to the egg whites as you beat.  Once all mixed, increase speed to medium and beat until a firm meringue forms.  You want a firm meringue with glossy peaks but not stiff peaks.  They should defy gravity and remain in the bowl if you turn it upside down.  If you tilt your bowl to the side and they are sliding out, keep beating.


5. Add the food coloring gel and mix.


6. Then fold in 1/3rd of the almond/sugar mixture into the meringue with a silicone spatula.  Once combined, add another third of the almond mixture. Add last bit.  This batter requires more deflation during this step since it creates such a poofy meringue.


7. Add the batter to a piping bag.  Pipe in rows using your template onto parchment paper.


8. Pick up the pan and beat until the counter.  The cookies need to rest on the counter between 30-60 minutes.  They are ready to go in the oven when they are dry to touch (the shell shouldn’t stick to your finger)


9.  Set the oven to 300F.


10. Bake the cookies for 13-15 minutes, one sheet at a time. They are done when they look kind of matte and seem firm when you lightly tap on them.  You can always rescue a slightly overcooked one with the maturation process that comes later, but you cannot rescue an undercooked one!!   


11. Remove from paper once completely cool. If they stick to the paper, they aren’t cool yet. Or you undercooked them.

For the orange cream filling, I’ve adapted the lemon macaron recipe from Laduree’s Sucre Book.

Ingredients

  • 160g granulated sugar
  • zest of 1 lemon, grated (approx. 5 grams)
  • 5g cornstarch (cornflour)
  • 3 eggs
  • 110mL orange juice 
  • 235g butter, softened

Directions

**Prepare the orange cream one day in advance.

1. In a bowl, mix together the sugar and orange zest. Then add the cornstarch.

2. Add the eggs one at a time and then the orange juice.

3. Pour this mixture into a saucepan and cook over low heat, stirring with a spatula until it simmers, allowing the cream to thicken.

4. Remove from heat. Allow the cream to cool slightly for approx. 10 minutes so that is hot but not scalding (approx. 140 degrees Fahrenheit).

5. Add the softened butter.

6. In a blender or food processor, blend the butter and cream together until mixed.

7. Keep in airtight container for minimum of 12 hours so that the cream may become firm.

8. Add to the macaron shells. Let macarons sit in the fridge for at least 1 day until serving. It will taste better this way, I promise!!

HELPFUL HINTS:

  • Use fresh squeezed orange juice. If you can’t squeeze it yourself, then get a really good store brand like Simply Orange.
  • Do NOT use frozen orange juice. 
  • Let the macarons sit in the fridge for at least 1 day.
the orange cream

The finished product, the shells didn’t bake perfectly.  They little feet didn’t form AND they are a little too puffy.  But here’s the great thing about thesee macarons…they were delicious anyway!

For my favorite product recommendations for making such delicate cookies, check out my amazon store

I’ve linked up with:The Scoop! at Confessions of a Plate Addict/Stone Gable,  Merry Mondays at my pinterventures Inspire Me Tuesday at a Stroll Thru Life, Do Tell Tuesday at a Vintage Zest,  You’re Going to Love it Tuesday at Kathe with an E,  Tickle my Tastebuds Tuesday  Cottage Style Party at Lavender Garden Cottage, Creative Ways at Posed Perfection  Wow us Wednesdays! at Savvy Southern Style Treasure Hunt Thursday at From My Front Porch To Yours, Feathered Nest Fridays at French Country Cottage, Sunday Best Showcase at Twigg Studios. Be sure to check out all of these fabulous blogging parties! A big thank you to all of the wonderful hosts!

Written  at http://peoniesandorangeblossoms.blogspot.com

Follow:

Pistachio Macaron Recipe!

We use affiliate links in our posts and our site. This means if you make a purchase using these links, we may earn a small commission. You don’t pay a cent more than you would otherwise! Our full disclosure is available under About.

… the Macaron Monday madness continues. This week I present to you my FAVORITE macaron recipe. Pistachio macarons!
This post may contain affiliate links. See my disclosure policy.

Pistachio macaron recipe

Now, this macaron shell recipe is different than the other macarons I’ve been making.  The key here is adding pistachio to the shell.

Materials needed

  • Materials needed:
    • a food scale (yes, you need this. I use this one)
    • a piping tip and piping bag (I like the ateco #806, I use these tips and piping bag
    • Food coloring (the gels or dry powder works best, not the liquid store stuff)
    • A macaron template (either make one or get one here or here. It makes piping easier)
    • food processor (for the cream filling, I use this one)

Pistachio Macaron Shell Recipe FOR A PRINTABLE RECIPE CLICK HERE

200g almond flour

75g pistachio flour (step 1)

250g powdered sugar

210g granulated sugar

6 egg whites (room-temperature)

1/8 cup chopped pistachios

food coloring (green is traditional color for this cookie)

1 Grind your unshelled pistachios (salted or unsalted, I prefer the salted) using a food processor. Be careful not to turn it into a paste. 

2 Sift almond flour, pistachio flour, and powdered sugar through a fine mesh screen into a bowl.

3 Whisk or using a beater, turn 6 egg whites to a foam.  Slowly add the granulated sugar to the egg whites as you beat.  Whip until the meringue has firm glossy peaks but not super stiff peaks. They should defy gravity and remain in the bowl if you turn it upside down.  If you tilt your bowl to the side and the meringue started to slide, keep beating.

4 Add your food coloring.

5 Then fold in 1/3rd of the almond/pistachio/sugar mixture into the meringue with a silicone spatula.  Once combined, add another third of the almond mixture. Then the last third. 

6 Add the batter to the piping bag.  Pipe in rows using your template onto parchment paper.

7 Pick up the pan and beat onto the counter.  Now sprinkle pistachio nuts on half of the cookies as a garnishment.

8 Preheat oven to 300 degrees.  The cookies need to rest on the counter between 30-60 minutes. They are ready to go into the oven when they are dry to the touch.  The shell shouldn’t stick to your fingers.

9 Bake the cookies for 13-15 minutes, one sheet at a time.  They are done when they look kind of matte and seem firm if you tap on them.  You can always rescue an overcooked cookie with the maturation process that comes later, but you cannot rescue an undercooked one!

10 Remove from the paper once completely cool.  If they stick to the paper, they either aren’t cool yet or you undercooked them.

11 Fill the cookies when cool with the filling below. 

12 Refrigerate overnight for best results.

Pistachio Paste Recipe

Ingredients

80g granulated sugar

25g water

1 whole egg

1 egg yolk

160g soft butter

1/4 cup shelled pistachios (grind in a cuisinart into a paste). 

Directions:

1 Mix the water with the sugar until the sugar dissolves and bring mixture to a boil in a small pan.

2 Heat sugar to 250 degrees.

3 Whisk whole egg with the extra yolk until it lightens.

4 When sugar mixture is 250 degrees, pour into the eggs.

5 Whisk until cool.

6 Then add butter and pistachio paste to the sugar mixture.

To assemble the macarons, add the filling to the shell side without the pistachio crumbled on top.  Then add the crumbled pistachio top.  Store in an airtight container for 24-48 in the refrigerator.  The cookies will taste better after you wait a day, I promise!

pistachio macaron recipe

These macarons are a little underfolded.  They should not form stiff peaks when you pipe them.  I should’ve mixed it a little more.

pistachio macaron recipe

I used the standard lime green dye by chefmaster.

pistachio macaron recipe

Making of the pistachio paste… boiling the sugar…

pistachio macaron recipe

 … the final pistachio paste. Looks gross. Tastes delicious.

pistachio macaron recipe

 The finished product:

pistachio macaron recipe

 YUM YUM. You need to try this recipe.

pistachio macaron recipe

This was another post as part of my series “Macaron Mondays”
So far I’ve made…
Salted Caramel Macarons
Lemon Macarons
Raspberry Macarons
Marionberry Macarons

For my favorite product recommendations for making such delicate cookies, check out my amazon store

I’ve linked up with:The Scoop! at Confessions of a Plate Addict/Stone Gable,  Merry Mondays at my pinterventures Inspire Me Tuesday at a Stroll Thru Life, Do Tell Tuesday at a Vintage Zest,  You’re Going to Love it Tuesday at Kathe with an E,  Tickle my Tastebuds Tuesday  Cottage Style Party at Lavender Garden Cottage  Wow us Wednesdays! at Savvy Southern Style, What’s it Wednesdays at Ivy & Elephants, Centerpiece Wednesdays at The Style Sisters Treasure Hunt Thursday at From My Front Porch To Yours, Feathered Nest Fridays at French Country Cottage, Sunday Best Showcase at Twigg Studios. Be sure to check out all of these fabulous blogging parties! A big thank you to all of the wonderful hosts!

Written at http://peoniesandorangeblossoms.blogspot.com

Follow:

From the Shop

I may earn a small commission if you purchase with these links

Caning Natural Tote Handbag - Universal Thread™
The Hustler High Waist Fray Hem Ankle Bootcut Jeans
Le Panier Pliage Raffia Crossbody Bag
Extra Large Le Pliage Panier Tresse Straw Tote
The Bennet Buttondown Shirt by Maeve
T Monogram Perforated Leather Bucket Bag
Mellow Stud Mule
Le Pliage Marinière Recycled Nylon Canvas Travel Bag
Unseen Sunscreen Broad Spectrum SPF 40 PA+++
Maxine Stripe Cotton Button-Up Shirt
Citizens of Humanity Charlotte High Rise Straight Jeans
Navy Equestrian Traversee M Linen Tote
Cream Carrie Blouse
Ellison Natural
Jolene High Rise Vintage Slim
Citizens of Humanity Blue Jolene Jeans
Charlotte High Rise Straight Jeans
Women's Le Pliage Filet Top Handle Bag - Ecru
Vintage cotton crewneck T-shirt
Air Heart Sunglasses
Le Pliage Torchon XS Top Handle Bag With Strap
Santorini Raffia Basket Bag
Chuck Taylor® All Star® Lift High Top Platform Sneaker
Please note that I use ShopSense, LIKETOKNOW.it, Shareasale and Amazon affiliate links on this site. This means using them for purchases won’t cost you extra but may earn me a small commission.  Our full disclosure is available for viewing under About in the disclosure policy.
All rights reserved. Our graphics, images and text are all subject to copyright protection.